
Introduction to No-Bake Cheesecake Flag Cake
There’s something truly special about dessert at celebrations, and a no-bake cheesecake flag cake is a delightful way to impress your guests without the heat of an oven! This refreshing treat stands out with its vibrant layers of fresh strawberries and blueberries, making it a picture-perfect addition to any patriotic gathering or summer barbecue.
Why Choose a No-Bake Dessert for Your Celebrations?
Opting for a no-bake dessert like this cheesecake has several advantages. First, it saves time and effort—especially helpful when you’re juggling multiple tasks for your event! There’s no need to worry about baking times or complicated techniques; simply mix, chill, and serve.
Additionally, no-bake desserts tend to have a light, airy texture that’s just perfect for warm days. The mouse-like filling in this cake will be a hit, leaving everyone wanting more. Plus, with minimal cooking required, you can keep your kitchen cool while still preparing something delicious.
If you want to learn more about the benefits of no-bake desserts, check out this helpful guide. So why not make your next celebration extra special with a stunning no-bake cheesecake flag cake? Your friends and family will love it, and so will you!

Ingredients for No-Bake Cheesecake Flag Cake
Creating your own no-bake cheesecake flag cake is not only delicious but also super easy! Let’s break down the ingredients for each component of this festive treat.
Crust Ingredients
For a delightful base, you’ll need:
- 1 ½ cups finely crushed graham cracker crumbs
- ¼ cup white sugar
- 2 tablespoons unsweetened cocoa powder
- 6 tablespoons butter, melted
These ingredients combine to form a crunchy backdrop that balances the creamy filling perfectly.
Filling Ingredients
The velvety filling is what makes this cake truly special. Gather:
- 1 cup cream cheese (at room temperature)
- 1 cup mascarpone cheese (at room temperature)
- 2 teaspoons grated lemon zest
- 2 teaspoons lemon juice
- 1 teaspoon vanilla extract
- ⅓ cup white sugar
- 1 ¼ cups cold heavy whipping cream
This mixture of cheeses and flavors creates a smooth, dreamy texture that everyone will love.
Decoration Ingredients
Finally, to give your cake that iconic Patriotic look, you’ll need:
- 20 large fresh strawberries, hulled and halved lengthwise
- 24 large fresh blueberries
Arranging these fresh fruits in a stars-and-stripes pattern not only adds to the flavor but also serves as a striking centerpiece for any gathering.
With these ingredients ready, you're just a few steps away from a delightful no-bake cheesecake flag cake. Happy baking! For more tips on fresh fruit decoration, check out this guide on fruit platters.
Preparing No-Bake Cheesecake Flag Cake
Making a no-bake cheesecake flag cake is a delightful way to celebrate any occasion, especially patriotic holidays. The beautiful layers of fresh fruit not only look stunning but also add a refreshing taste to the creamy cheesecake filling. Here’s how to prepare this festive dessert step by step.
Make the crust
To start off, you'll want to create a flavorful base for your no-bake cheesecake flag cake. In a mixing bowl, combine 1 ½ cups finely crushed graham cracker crumbs, ¼ cup white sugar, 2 tablespoons unsweetened cocoa powder, and 6 tablespoons melted butter. Mix these ingredients until they’re well-blended and crumbly. Next, transfer the mixture into a 9x11-inch baking dish and press it firmly into the bottom. This creates a solid crust that holds everything together. Cover the dish with plastic wrap and refrigerate it for about 30 minutes to let it set.
Prepare the filling
While your crust chills, it’s time to whip up that luscious filling. Take 1 cup cream cheese and 1 cup mascarpone cheese (both should be at room temperature) and beat them together until smooth. Add 2 teaspoons grated lemon zest, 2 teaspoons lemon juice, and 1 teaspoon vanilla extract to this mixture for a hint of bright flavor. In a separate bowl, take 1 ¼ cups cold heavy whipping cream and whisk in ⅓ cup sugar until it forms soft peaks. Gently fold this whipped cream into your cheese mixture. This combination not only offers a delightful texture but also a wonderful flavor to your no-bake cheesecake flag cake.
Assemble the cake layers
Now that your filling is ready, it’s time to bring the cake together. Spoon the filling on top of the chilled graham cracker crust, smoothing the top with a spatula. Tap the pan gently on your kitchen counter to eliminate any air pockets. Once that’s done, cover the pan tightly with plastic wrap and pop it back in the fridge to chill for at least 3 hours until it’s beautifully set.
Chill the cheesecake
Chilling the cheesecake is crucial because it allows all the flavors to meld beautifully. The longer it sets, the more delightful the taste will be. Plus, this waiting time gives you a chance to get your festive decorations ready!
Decorate for the celebration
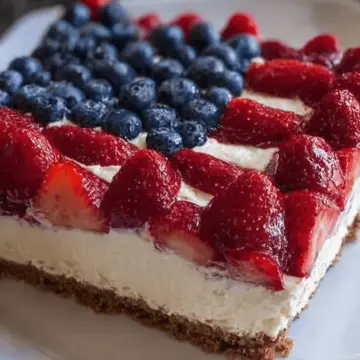
When your cheesecake is fully chilled and set, it’s time to paint the American flag on top! Start by arranging strawberry halves horizontally for your stripes, aligning them neatly across the cake. For the blue field, fill the upper left corner with fresh blueberries to resemble stars. It’s a fun and creative endeavor that you’ll want to share on social media; just make sure to take a picture before it disappears!
By following these simple steps, you'll not only prepare a tasty no-bake cheesecake flag cake but will also impress your guests with your decorating skills. Whether it’s July 4th or just a summer gathering, this dessert is sure to steal the show!

Variations on No-Bake Cheesecake Flag Cake
Seasonal Fruit Options
One of the best things about this no-bake cheesecake flag cake is its versatility with fruits! In addition to strawberries and blueberries, consider using raspberries, blackberries, or kiwi for a vibrant twist. For a more tropical vibe, try topping with sliced mango or pineapple during summer months. Freshness and color are key—get creative and choose fruits that are in season for the best flavor.
Different Flavors for the Cheesecake Filling
Why stick to the classic flavor when you can mix things up? Substitute the lemon zest and juice with lime or orange for a zesty kick. You can also infuse your filling with extracts like almond or coconut for a unique taste. For chocolate lovers, fold in melted dark chocolate or cocoa powder to create a rich chocolate no-bake cheesecake flag cake. The possibilities are endless, ensuring that each cake can have its own personality!
Cooking tips and notes for No-Bake Cheesecake Flag Cake
Importance of ingredient temperature
To create your no-bake cheesecake flag cake, be sure to use ingredients at room temperature, especially your cream cheese and mascarpone. This tip is crucial because room-temperature ingredients blend more smoothly, resulting in a luscious, creamy filling. For a quick way to warm up your cream cheese, cut it into cubes and let it sit out for about 15 minutes.
Achieving the perfect texture
Whipping your heavy cream until it forms soft peaks is key to achieving that light, airy texture we all love in a cheesecake. Remember to fold the whipped cream into your cheese mixture gently to maintain that fluffiness. If you over-mix at this stage, you might end up with a denser cheesecake, which we want to avoid. A helpful tip? Chill your mixing bowl in the freezer for a few minutes before whipping for the best results!
For other tips on achieving the perfect cheesecake, check out detailed guides on The Kitchn or Serious Eats.

Serving suggestions for No-Bake Cheesecake Flag Cake
Perfect pairings for summer gatherings
Nothing says summer celebration like a slice of no-bake cheesecake flag cake! Enhance your dessert table with refreshing sides like juicy watermelon slices, a light summer salad, or even grilled veggies drizzled with lemon vinaigrette. For drinks, consider serving sparkling lemonade or iced herbal tea to keep things vibrant and refreshing. These pairings not only complement the rich flavors of the cheesecake but also add to the festive atmosphere of any backyard barbecue or patio gathering.
Creative serving ideas
When it comes to serving this stunning cheesecake, presentation is key! For an eye-catching centerpiece, place individual slices on colorful plates, garnished with sprigs of fresh mint or a dollop of whipped cream. If you want to sprinkle in a bit of flair, serve it in mason jars layered with extra berries. You can even create a mini version in cupcake liners for easy grab-and-go treats. Whatever you choose, your guests are sure to appreciate the creativity behind this no-bake cheesecake flag cake!
For tips on dessert presentation, check out this fantastic article on garnishing techniques for some extra inspiration!
Time Breakdown for No-Bake Cheesecake Flag Cake
Preparation Time
You'll need about 30 minutes to whip up this stunning no-bake cheesecake flag cake. This includes blending the crust and filling, as well as arranging your beautiful fruit topping.
Chilling Time
Plan for at least 3 hours of chilling time to ensure your cake sets perfectly. This step is crucial for achieving that delightful mousse-like texture.
Total Time
In total, you're looking at 3 hours and 30 minutes from start to finish. Perfect for prepping ahead of your next gathering!
This flag cake will be the highlight of your celebration—its vibrant colors and creamy flavor are unbeatable. Want to explore more delicious no-bake desserts? Check out this link for more inspiration!
Nutritional Facts for No-Bake Cheesecake Flag Cake
Calories per Serving
Each serving of this delightful no-bake cheesecake flag cake contains approximately 381 calories. This includes a satisfying combination of rich textures and delightful flavors that come without the need for baking.
Key Nutrients
In addition to being a delicious treat, the no-bake cheesecake flag cake offers a variety of nutrients:
- Total Fat: 32g
- Saturated Fat: 19g
- Cholesterol: 94mg
- Sodium: 182mg
- Total Carbohydrates: 22g
- Dietary Fiber: 1g
- Total Sugars: 15g
- Protein: 5g
- Vitamin C: 19mg
- Calcium: 69mg
- Iron: 1mg
- Potassium: 122mg
This cake is particularly rich in calcium and vitamin C, making it not just a treat but a dessert that contributes to your nutritional intake. Whether you're serving this for a special occasion, like the 4th of July, or simply want to impress friends at a dinner party, you'll be pleased to know it's both tasty and somewhat nutritious! For more information on the health benefits of ingredients like cream cheese and fresh fruit, check out Healthline.
FAQs about No-Bake Cheesecake Flag Cake
Can I substitute ingredients?
Absolutely! You can customize your no-bake cheesecake flag cake to your taste. For instance, swap mascarpone with ricotta cheese or cream cheese for a different flavor profile. If you're out of graham crackers, try crushed Oreos for a chocolatey twist. You can even use dairy-free alternatives to make it vegan-friendly—just ensure your substitutes maintain a similar texture.
How long will it last in the fridge?
Your delicious no-bake cheesecake flag cake can last for about 3 to 5 days in the fridge. Just be sure to cover it tightly with plastic wrap to keep it fresh and avoid any fridge odors. The flavors may even enhance a bit as it sits!
Can I make it a day in advance?
Definitely! In fact, making this cake a day ahead is a great idea. It allows the flavors to meld beautifully and ensures that the filling sets perfectly. Just store it in the refrigerator until you're ready to serve. Your guests will appreciate the extra attention to detail!
For more tips on ingredient substitutions and storage, check out this helpful guide.
Conclusion on No-Bake Cheesecake Flag Cake
Why this dessert is a must-try!
The no-bake cheesecake flag cake is more than just a dessert; it’s a celebration on a plate! Perfect for summer gatherings or any patriotic occasion, this cake offers a delightful, creamy texture without the hassle of baking. Impress your guests with its stunning presentation as well as its delicious taste. Get ready to make this dessert your go-to for any festive event!
No-Bake Cheesecake Flag Cake: The Best Festive Dessert Recipe
Equipment
- 9x11-inch baking dish
Ingredients
Crust
- 1.5 cups finely crushed graham cracker crumbs
- 0.25 cups white sugar
- 2 tablespoons unsweetened cocoa powder
- 6 tablespoons butter, melted
Filling
- 1 cups cream cheese at room temperature
- 1 cups mascarpone cheese at room temperature
- 2 teaspoons grated lemon zest
- 2 teaspoons lemon juice
- 1 teaspoon vanilla extract
- 0.333 cups white sugar
- 1.25 cups cold heavy whipping cream
- 20 large fresh strawberries, hulled and halved lengthwise or as needed
- 24 large fresh blueberries or as needed
Instructions
Preparation
- Combine graham cracker crumbs, ¼ cup sugar, cocoa powder, and melted butter in a bowl until mixture is thoroughly combined and crumbly.
- Transfer crust mixture to a 9x11-inch baking dish. Press crust into bottom of dish until smooth and even. Cover dish with plastic wrap and refrigerate until set, about 30 minutes.
- Mix cream cheese and mascarpone cheese in a bowl until thoroughly combined. Stir in lemon zest, lemon juice, and vanilla extract into mixture.
- Whisk ⅓ cup sugar into whipping cream in a separate metal or glass bowl until the cream is fluffy and forms soft peaks. Add whipped cream to the cream cheese mixture and gently whisk until filling is soft, fluffy, and well combined.
- Spoon filling on top of the graham cracker crust, spreading and smoothing the top. Tap the pan gently on a work surface several times to settle the crust and filling. Cover pan tightly with plastic wrap and refrigerate until chilled and set, at least 3 hours.
- Starting at the bottom long edge of the cake, arrange strawberry halves in a horizontal line with the pointed bottoms of the strawberry halves pointing to the right. Start a second stripe of strawberry halves at the top right of the cake, arranging strawberries with the bottoms pointing right in a line stretching about ⅔ of the length of the cake.
- Continue to make strawberry stripes, starting about ¾ inch up from the bottom stripe and laying down 3 more stripes stretching the full length of the cake. Make 1 more line of strawberries beneath the short stripe to leave a square space for the blue field of stars.
- Lay a line of blueberries with the blossom ends pointing up in the upper left square space. Continue to lay down blueberries in lines, berries touching the previous line, until the square is filled with blueberries. Cut cake into squares to serve.

Leave a Reply