
Introduction to Easy Cool Whip Candy Recipe
Homemade candy offers a unique blend of creativity and indulgence that store-bought treats simply can’t match. There’s something undeniably satisfying about crafting your own sweets—from picking out fresh ingredients to the final taste test. If you’ve never made candy from scratch, this is the perfect opportunity to delve into a fun, delicious hobby. Our Easy Cool Whip Candy Recipe is not only a delightful treat, but it’s also incredibly simple to whip up—perfect for busy young professionals looking to impress friends or indulge in a little self-care.
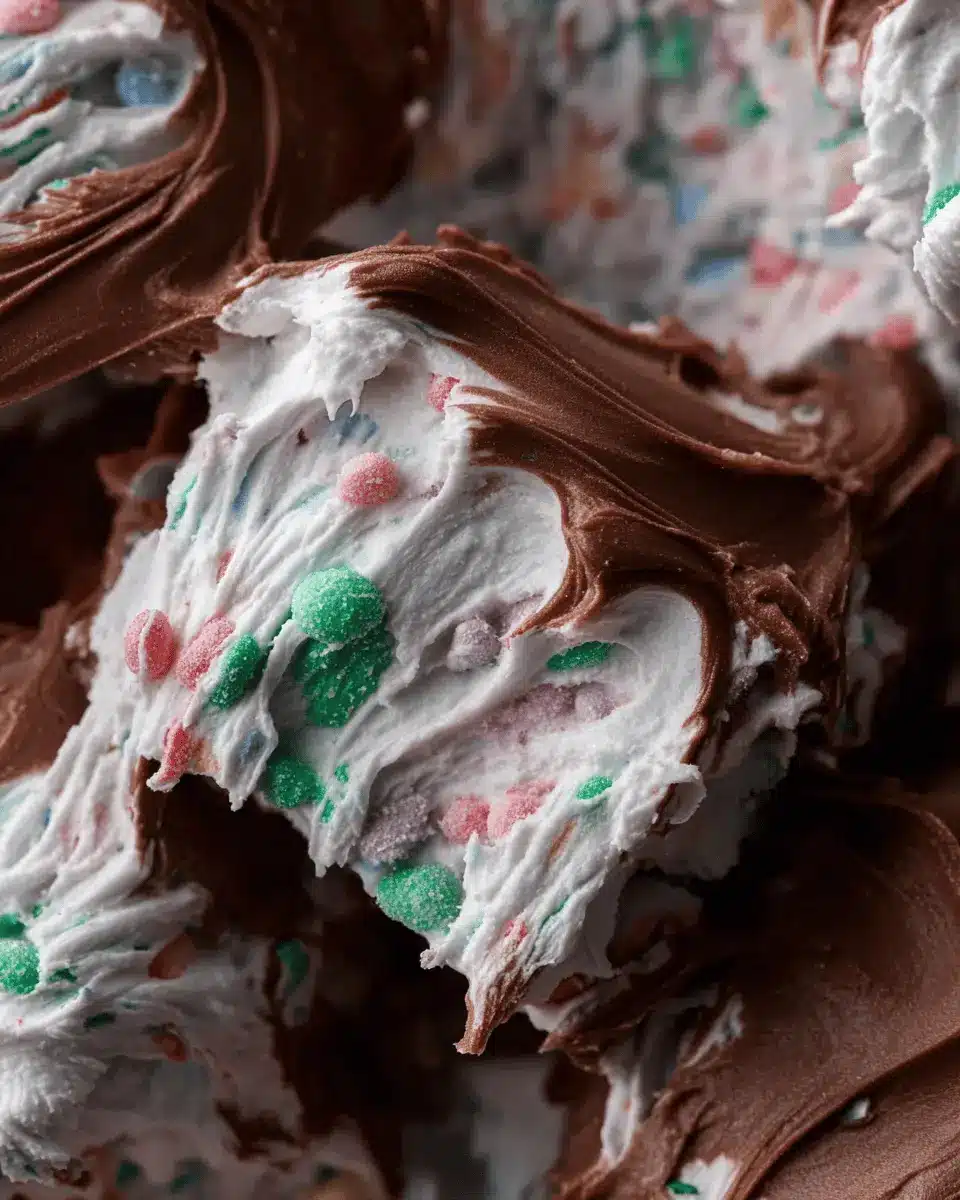
Imagine the joy of popping these creamy, chocolate-dipped squares into your mouth after a long day. And the best part? You can customize them with festive sprinkles or even a hint of sea salt for that added sophistication. Did you know homemade candies can also make thoughtful gifts? Give your coworkers homemade treats to lighten the office mood, or surprise your friends at a gathering. If you’re looking for high-impact desserts with minimal effort, this recipe will elevate your candy game while ensuring everyone keeps coming back for more. Ready to dive in? Let’s explore how to bring this easy, chocolatey goodness to life!

Ingredients for Easy Cool Whip Candy
Creating this easy Cool Whip candy recipe is not just a fun activity; it’s all about the joy of simple ingredients coming together to form a delicious treat. Here’s what you’ll need:
Essential ingredients you'll need
-
24 oz milk chocolate chips
These bring a smooth, creamy texture to your candy. You can find quality options here. -
8 oz Cool Whip, thawed
The star of this recipe adds fluffiness and sweetness. -
24 oz dark chocolate, chopped
For that rich topping that perfectly contrasts the sweetness. -
Festive sprinkles
These not only add an eye-catching finishing touch but enhance the party vibe!
Optional ingredients to jazz it up
-
Nut varieties
Consider adding chopped almonds or walnuts for crunch. -
Flavored extracts
A dash of vanilla or almond extract can elevate flavors. -
Unique toppings
Think of crushed candies or a drizzle of caramel to personalize your treats.
With these ingredients, you’re set to whip up a delightful batch of candies that will impress everyone!
Preparing Easy Cool Whip Candy
Creating your own easy Cool Whip candy is a delightful adventure that doesn't require a culinary degree! Below, you'll find a friendly guide to make this treat in just five simple steps. Let’s dive in!
Melting the chocolate chips
First things first: you'll want to melt the 24 oz of milk chocolate chips. The microwave is your best friend here. Place them in a microwave-safe bowl and heat for one minute. After that, give them a good stir. If they’re not melted, continue in 30-second intervals until smooth and glossy. This part is crucial because overcooking can lead to a lumpy mess. Once melted, allow the chocolate to cool to room temperature for about 10-15 minutes. This ensures that when combined with the Cool Whip, you won’t accidentally melt it.
Mixing in the Cool Whip
Now that your chocolate is cool, grab that 8 oz tub of Cool Whip and fold it into the melted chocolate. Use a rubber spatula for this; it helps maintain the light, airy texture of Cool Whip. Gently fold until just combined, ensuring no streaks remain. This mixture should be light and fluffy! Once it's perfectly blended, spread it evenly into a parchment-lined 8×8-inch baking dish. It’s starting to look like candy already, isn’t it?
Freezing and cutting the candy
Here comes the patience part—we need to freeze! Pop your dish into the freezer for about 30 minutes. This will allow the mixture to firm up, making it easier to cut. After 30 minutes, take it out and cut into 36 squares. Lay those cute little squares on a parchment-lined baking sheet and return them to the freezer for another half-hour. Trust me, this step helps them hold their shape, making the next phase a whole lot easier!
Dipping in dark chocolate
Once your candy squares are nicely set, it’s time to indulge in dark chocolate! Melt the 24 oz of dark chocolate according to package instructions. Dip each square using a chocolate dipping fork or a fork—whatever you prefer! Make sure to let the excess chocolate drip off before placing them back on the lined baking sheet. This is also the perfect time to sprinkle on some festive decorations. Who wouldn’t love a little extra flair?
Storing the finished product
Finally, once dipped and decorated, store your easy Cool Whip candy in the freezer until you’re ready to serve. These treats can last quite a while—perfect for when those sweet cravings hit or when guests come over. Just remember, they’re best enjoyed frozen!
With these straightforward steps, you’ll impress your friends and satisfy your sweet tooth in no time. Happy candy making!

Variations on Easy Cool Whip Candy
Adding nuts or dried fruits
Elevate your easy Cool Whip candy recipe by tossing in some chopped nuts or dried fruits! Favorites like almonds, walnuts, or pecans add a delightful crunch, while dried cherries or cranberries introduce a touch of tart sweetness. When mixing, aim for about a cup of your chosen add-ins. It’s an easy way to enhance texture and flavor, making each bite even more satisfying. Plus, nuts and fruits are packed with nutrients, so you can feel good about indulging.
Flavor variations with different chocolates
Don’t hesitate to experiment with different chocolates to customize your easy Cool Whip candy recipe! Swap out milk chocolate for semisweet or white chocolate for a unique twist. Think of drizzling caramel or using flavored chocolate wafers, like mint or raspberry, to transform your creations into seasonal delights. Each variation opens a new world of taste, making these candies ideal for any occasion. Remember: a little creativity goes a long way in the kitchen! Happy candy-making!
Cooking Tips for Easy Cool Whip Candy
Essential Equipment You'll Need
Creating this easy cool whip candy recipe is a breeze with just a few essential tools. Be sure to have:
- Microwave-safe bowl: For melting chocolate chips effortlessly.
- Parchment paper: Line your baking dish to prevent sticking and make cleanup easy.
- Chocolate dipping fork: Ideal for dipping the frozen squares into dark chocolate without the mess.
- Baking sheet: To place the candies while they harden.
Having the right equipment can make a big difference in your candy-making adventure!
Common Mistakes to Avoid
When whipping up your easy cool whip candy, it helps to be aware of these common pitfalls:
- Overheating chocolate: Always melt in intervals to prevent scorching.
- Skipping the cooling step: Allow the melted chocolate to cool to room temperature before mixing with Cool Whip to maintain the perfect texture.
- Not freezing long enough: Ensure each layer freezes properly to avoid messy dipping later.
By keeping these tips in mind, you'll create delightful, evenly melted, and perfectly set candies every time! Happy candy-making!
Serving Suggestions for Easy Cool Whip Candy
Ideal Occasions for Serving This Candy
This easy cool whip candy recipe is perfect for a variety of occasions! Whether you’re hosting a birthday party, a cozy movie night with friends, or a summer barbecue, these candies are sure to impress. Their delightful flavor and charming appearance make them an excellent treat for holiday gatherings or even as a fun addition to a dessert table at a wedding. Plus, they can be made in advance and stored in the freezer, making them a stress-free option for any event!
Presentation Ideas to Impress Guests
Elevate your easy cool whip candy by thinking about presentation. Place the finished candies in decorative cupcake liners on a tiered dessert stand for an eye-catching display. Dust them with a little powdered sugar or drizzle some melted chocolate on top for that gourmet touch. You might even consider pairing them with fresh fruits or a side of homemade whipped cream to create an enticing dessert platter. Remember, a little creativity goes a long way—your guests will be delighted with this stunning, yet simple treat!
Feel free to explore more tips on party planning and dessert presentations on Food Network for inspiration!
Time breakdown for Easy Cool Whip Candy
Preparation time
Getting started with this easy Cool Whip candy recipe is a breeze! You'll only need about 15 minutes to gather ingredients and prepare the chocolate mixture.
Freezing time
Once you’ve mixed your ingredients, the freezing time totals about 1 hour. This ensures your candy sets perfectly, giving it that delightful texture we all love.
Total time
In total, you’re looking at around 1 hour and 15 minutes from start to finish. It’s a small investment for such a delicious treat, isn’t it? Perfect for parties or a sweet snack at home!
Nutritional Facts for Easy Cool Whip Candy
When indulging in this delightful Easy Cool Whip Candy recipe, knowing its nutritional value can help you enjoy it more mindfully. Here's a quick overview:
Calories
Each piece of Easy Cool Whip Candy packs about 100 calories. While it's a sweet treat, moderation is key to enjoying them without worry.
Carbohydrates
These little squares contain approximately 12 grams of carbohydrates. With chocolate and whipped components, they definitely satisfy a sweet tooth while providing a bit of energy.
Sugars
You can expect around 9 grams of sugar per piece. The combination of milk and dark chocolate gives this candy its signature sweetness, making it a perfect dessert for special occasions.
Remember that all treats are best enjoyed in moderation—this delicious candy is no exception! For more insights on sweet ingredients, check out sources like the USDA FoodData Central or NutritionData.Self.com.
FAQs about Easy Cool Whip Candy
Can I use a different type of whipped topping?
Absolutely! While the Easy Cool Whip Candy Recipe calls for Cool Whip, you can substitute it with a lighter whipped topping or even homemade whipped cream. Just keep in mind that homemade options might alter the candy's texture slightly, but they can also add a fresh taste.
How long can I store the candy in the freezer?
You can store your delicious candy in the freezer for up to three months. Just remember to keep it in an airtight container or tightly wrapped to maintain its flavor and texture. When you're ready to indulge, thaw them for a few minutes at room temperature or pop them in the microwave for a few seconds.
What if I don’t have chocolate dipping forks?
No worries at all! If you don’t have chocolate dipping forks, you can use a regular fork or even a toothpick. Just make sure to coat them lightly with chocolate and allow the excess to drip off before placing them on the parchment-lined sheet. Your Easy Cool Whip Candy will turn out just as delightful!
Conclusion on Easy Cool Whip Candy
Wrapping up the sweetness and creativity
Making this easy cool whip candy recipe isn't just about indulging your sweet tooth; it's a chance to flex your creativity in the kitchen. With simple ingredients and straightforward steps, you can impress friends and family. Store them in the freezer and enjoy these delightful treats anytime you crave a touch of sweetness! Happy cooking!

Easy Cool Whip Candy Recipe: A Delightfully Indulgent Treat
Equipment
- microwave
- 8×8-inch baking dish
- parchment paper
- Chocolate dipping fork
Ingredients
Chocolate Ingredients
- 24 oz milk chocolate chips Melted for the base
- 8 oz Cool Whip Thawed
- 24 oz dark chocolate Chopped for dipping
- festive sprinkles Optional topping
Instructions
Preparation Steps
- Microwave chocolate chips for 1 minute; stir and continue in 30-second intervals until melted. Cool to room temperature (about 10-15 minutes).
- Line an 8×8-inch baking dish with parchment. Fold melted chocolate into Cool Whip and spread evenly.
- Freeze for 30 minutes, cut into 36 squares, transfer to a parchment-lined baking sheet and freeze again for 30 minutes.
- Melt dark chocolate wafers as instructed on the packaging. Dip each square using a chocolate dipping fork and place on a parchment-lined sheet to harden. If you want to top your candies with sprinkles now is the time to do so.
- Store in the freezer until ready to serve. Enjoy!


Leave a Reply